
Mediasoft Technologies Main Office Contact Information:
228, rue de la Convention
75015 Paris - France
Support:
Frederic VALERY
Jean-Pierre BLONDEL
Sales:
Jean-Pierre BLONDEL
Download:
To download the latest release of the software and/or additional material, please click here.
User's Club:
Lots of exciting things come from the users. That's why an entire section of the site is dedicated to you. Please click here.
Partners:
You are, or you want to become one of our partners? Please click here.

Welcome to the eMedia Card Designer Newsletter!
This newsletter provides to you insight and information about your favorite card printer software.
In this issue:
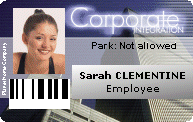
Using an index or any other information that depends on the card holder profile, the formula evaluator in the software allows the personalization of the cards.
The "Corporate Card" sample shows how to change the color of a part of the card, according to the company department of the employee.
The "Corporate Card" sample is provided with the full installation of eMedia Card Designer. To try it, just open the card template, located in the "Samples\Color Printer - English" subfolder.
You may also download it from our server by clicking here.
If your pictures contain black dots, the card printer will use the black ribbon. Some white pixels may then appear on the printout. To avoid this, eMedia Card Designer can lighten up your pictures so the black dots will be printed in composite black.
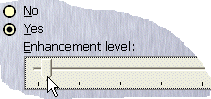 This
automatic enhancement can be enabled or disabled at any time:
This
automatic enhancement can be enabled or disabled at any time:
Open the "Options" dialog box from the "Tools" menu, and select the "Printing / Pictures" category on the left.
You may then enable or disable this feature, and if enabled, define the enhancement level to apply to the pictures to avoid the black ribbon usage.
In operating mode, the pictures acquired are saved in files. The name of these files can be set automatically, manually or using a formula. The corresponding option must be set in the properties pane ("FileNaming" property) of the photo object at design time. But, by default, the "Rule" choice is not available. To enable it:
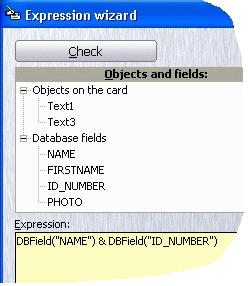
Open the "Options" dialog box from the "Tools" menu, and select the "Images / More options" category on the left, then check the box "Allow 'Rule' for image naming".
Once this option is set, the "Rule" choice appears in the combo-box of the "FileNaming" property. Select this choice to unlock the "FilenameRule" property.
Enter a formula in the "FilenameRule" property (or click on the "Expression Wizard" choice to display the corresponding dialog box). This formula will apply to give a name to the new pictures acquired.
In the example on the left, the picture file on the disk will be named as the concatenation of the name and the ID of the card holder, using the corresponding database fields values: the DBField() function returns the value of a database field, and the "&" operator performs a concatenation.
For instance, with this formula, the identity picture of Mr. Smith, ID #124 will be saved as "Smith124.jpg"
Introducing with the new version 6 of the software, all information between our servers and you will be delivered by e-mail messages in HTML format. This includes support, informations, license keys and registrations performed by your customers.
So, you must configure your anti-spam software to consider as regular messages those in HTML format in which the "from" field contains "@emedia-cards.com" and sent by our SMTP servers that belong to the "suptel.net" domain (RDNS must not fail).